Update 240407: Be sure to check out some updated instructions in this earlier post: POI’s on the Mio c310x, part II! Both ways work, it’s up to you!
My sister-in-law recently bought a Mio c310x from Frys.com; they have them for $189 free shipping, (until supplies last). It’s different enough from her old(er) Garmin, there is a steep learning curve. I guess if you get used to one UI, then it might make it more challenging to learn a new one. I was over at her house tonight trying to show her how to input POI’s, Points of Interest, into her Mio via the PC. It was a little challenging since I began to forget how I set it up and by the time I got it going we had to leave. So I promised her I would write something up. This should help you get up and running for adding your POI’s quickly and painlessly. First, you need some things before you begin:
- unlocked Mio c310x
- Microsoft ActiveSync
- Google Earth
- iGo POI Explorer
- Can be found here:
- http://inetcom.hu/mick/igo/
- Adding POIs to the Mio C310x @ GpsPassion
(Leah, if you are reading this, you are already past this point. You got everything you need!)
By the way, I should mention that as Realtors, I am keeping that sort of functionality in mind. The overall goal is to make a list of properties or addresses and visit each one in the most efficient manner. Oh, and this is all Windows based. So far, I haven’t seen any way to do this on a Mac.
I’m not going to get into the how-to’s to install ActiveSync or the rest of the software. Here’s what you need to do once you get all the mentioned software installed.
- If you haven’t already created and save a POI on the c310x itself. You need to do so. the iGo software looks for a specific database file that doesn’t exist until you do. Simply go into the “Map View” or similar (depends on what skin you are using), and find an address. If you are in the Map view, you should automatically get the bottom menu that pops up and says, “Save POI.” If you save it, you will have your iGo.db file that we need to have initially on your device.
- Fire up Google Earth. Select “My Places” and select “Add” and choose “Folder.” Name the folder something useful. In my example, I named my folder “List of POIs.” Next, in “Search” box, make sure the “Fly To” tab is selected. Enter your address here.
-
As Google Earth zooms in, you should see your address in the lower pane in the “Search” box. You can click and drag that entry into the folder you made in step 2. Repeat for the other addresses you want.
- Next, you need to export the folder to a file you can read into the iGo POI Explorer.
- Right click on your folder from Step 2 above.
- Choose “Save As” and pick a place and a name where you can find it and remember what it was called.
- You are done with Google Earth… for now. Close it up.
- Next, connect your Mio and have it connect with ActiveSync. I would suggest have it connected for the next steps.
- Fire up the iGo POI explorer program. If you haven’t gotten it setup yet, go to Tools -> Options and make it look like the following:
- Next, import the file you made in Step 4.
- In iGo POI Explorer choose File -> Import -> POI’s from File. In the “Files of Types” menu from the Import window, choose “Google Earth KMZ file (*.kmz)”:
- The folder now should appear outside the “iGO POI Database.” Drap it into the top level “iGO POI Database so it appears with your other POI’s. After you do this, it should show up in the main tree and all of your addresses you entered are shown as coordinates. Pretty slick if you ask me:
- In iGo POI Explorer choose File -> Import -> POI’s from File. In the “Files of Types” menu from the Import window, choose “Google Earth KMZ file (*.kmz)”:
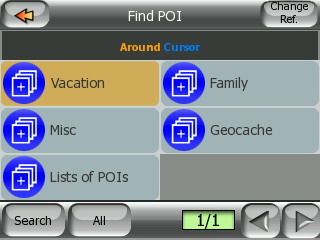
- Now, I found I need to restart my Mio twice. How you restart it twice is up to you, but I don’t see the changes unless I do. So, after the second restart, fire up Mio Map. Choose your favorite method of looking at the Map or Cockpit and check out your POI’s:
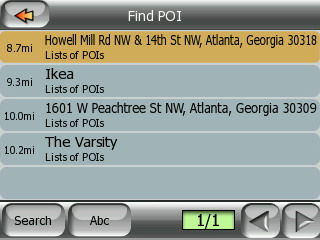
- Notice how the address are ranking from closest to furthest. At this point you can just choose to “route to” the next closest POI. You can set up a “route” if you want. But this should get you going.
Perhaps in my next post, I’ll continue about setting up a route with the various POI’s. I hope you found this helpful.


 FourSquare
 GooglePlus
 LinkedIn
 Twitter
You spent alot of time typing this up – I appreciate it.
I will try to follow your instructions and give it a go.
Pingback: POI’s on the Mio c310x, part II at Eat your Vegetables!
Pingback: foobarred POI’s on my Mio c310x at Eat your Vegetables!
thanks!
I’ve been looking around and maybe you’ve already figured this out. Have you found any way to copy the internal POI database of the Mio? i.e., not the ones I’ve created, but rather the ones that come with the unit. I have both the c310x and c520, but can’t find that file. Pls keep me posted if you find something.
Thanks, BenjiJK
@Benjii:
The POI’s on the Teleatlas maps that are used by the MiO are embedded in the map files.
There is no seperate file that contains the POI’s.
Pingback: Gps - Page 3 - Sportbikes.net
I was following your tutorial and was working fine with an older version of Google maps. Now I donloaded the 4.2 version and when I try to open my google file with IGo POI Explorer it says that there’s no POI in that file. Any help????